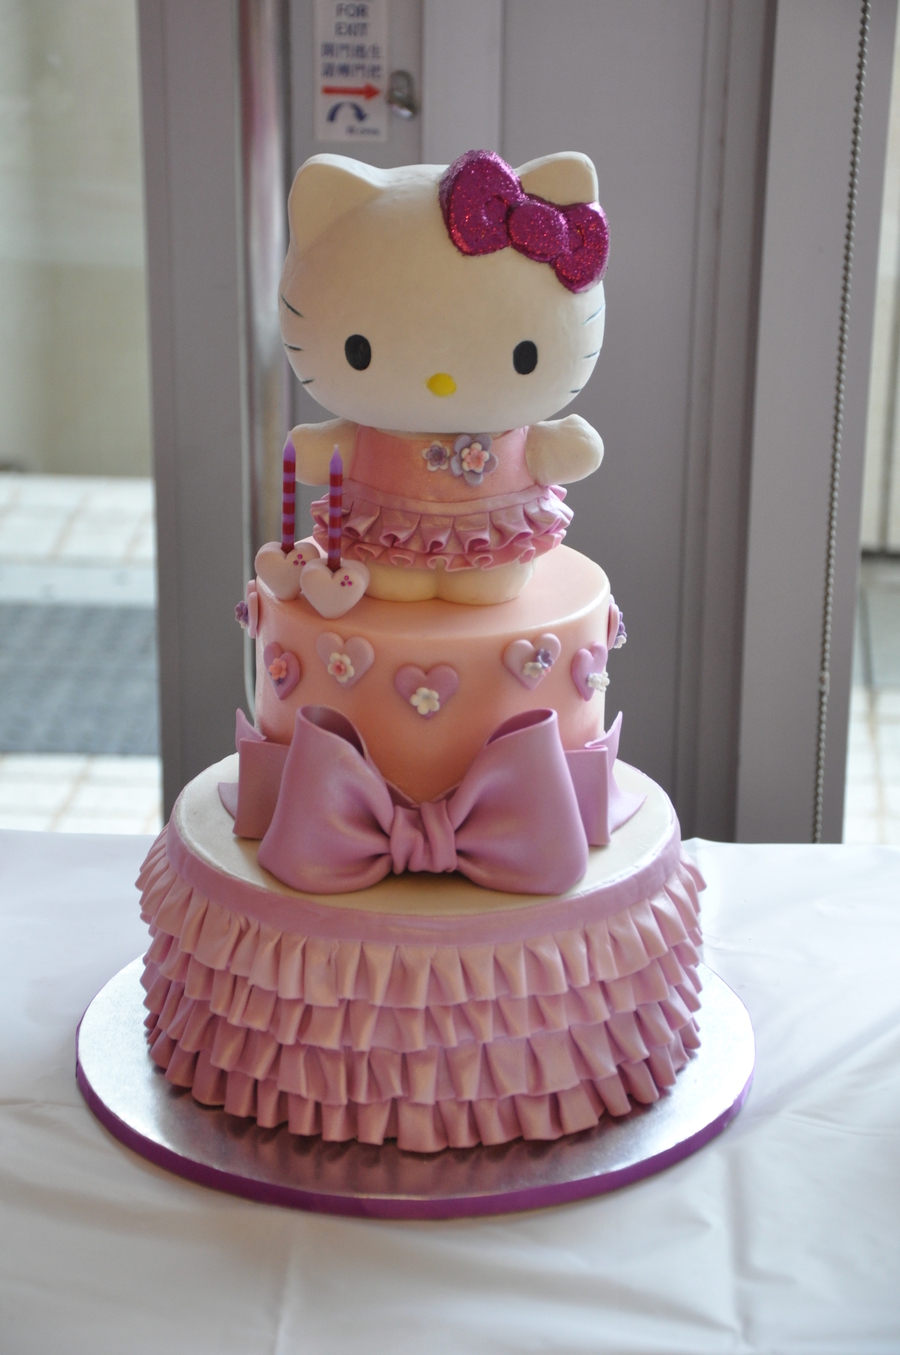
Enjoy a fluffy yummilicious Hello Kitty cakes whenever your child wants it! Go with the flow and make Hello Kitty cake within no time!
Ingredients for a Fluffy Sponge Cake:
- 1 cup (250 grams) of All-Purpose Flour
- 3 Eggs
- 2 Table Spoon of Corn Starch
- ½ Teaspoon Vanilla Extract
- 1/3 Cup Granulated Sugar
- 1 Pinch of Salt
- 2 Table Spoon Oil
- 2 Table Spoon Milk
Follow the given procedure to bake Hello Kitty Cakes’ Sponge
Take a bowl:
- Take 1 cup (250 grams) of All Purpose flour in a bowl
- Take 2 tbsp flour out aside.
- Add 2 tbsp (14 grams) of cornstarch and mix them all thoroughly.
- Take a colander to sieve the mixture gradually into another empty bowl. Make sure to sieve it slowly for about five minutes so that no lump is left in the batter.
- Now, the smooth cake flour is ready for a soft and good rise cake.
Take 2 new bowls this time:
Egg White Mixture:
- On the other side, take 3 Eggs (150 grams).
- Take a medium to the big bowl. Separate egg yolks and white apart in 2 different bowls.
- Beat the egg whites until you get a sniff peak. Keep in mind that if you want a fluffy sponge of your cake, then a sniff peek is essential.
- Egg yolks have high fat which prevents the egg white from foaming and fluffing.
- Now, beat egg whites for about 2-3 minutes.
- Add 1/2 tsp (2.5ml) vanilla extract into the egg whites and beat for another 30 seconds.
- Add 1/3 cup along with 1 tbsp of sugar(80 grams) and stir well. Add the sugar gradually in 4 different rounds.
- Keep beating the egg white mixture until you get a sniff peak.
Egg Yolk Mixture:
- Now, add a pinch of salt to the egg yolk and whisk well for at least 1-2 minutes.
- Add egg yolks gradually in multiple turns to the egg white mixture that you have recently prepared.
- Take the cake flour ¾ cup (80 grams) and add the cake flour gradually into the egg mixture. Keep in mind that we are not adding any baking soda or baking powder to this cake.
- Mix the batter gently from bottom to top with the help of a clean spatula.
- Mixing is important to keep the sponge cake light and fluffy. Make sure to mix it well until no flour is left. If you are mixing in a hurry, then calm down yourself first and mix it properly for about 7-10 minutes. Otherwise, all your efforts will go in vain and you will end up having a hard dense cake.
Take a new bowl:
- Add 2 tbsp of oil (30 ml) to a new bowl
- Add 2 tbsp of milk (15ml)
- Add 1/2 tsp (2.5ml) of Vanilla Essence and mix well.
- Take a small amount of cake batter and add it to the mixer and mix thoroughly.
- Follow this process again when you add it back to the cake batter.
- Mix the batter gently for 4-5 minutes.
- Avoid overmixing or else, the foam will break and you will not get fluffy cake.
Baking Preparations:
- Take a standard round pan and grease parchment paper on it.
- Pour the mixture gradually into the pan.
- Shake the tin a little before putting it in the oven for baking.
- Bake it in a preheated oven for 30-35 minutes at 160 Degrees Centigrade or 320 Degrees Fahrenheit.
Make sure to follow the same recipe to prepare a second sponge as well.
It’s Hello Kitty Cakes decor Time!
Hello Kitty cake has made it to the top of the cake. So, here we go!
Take a Bowl:
- You are going to need a bowl. Pour in a pack of brilliant white and fluffy frosting cream.
- Get a cake-sized Hello Kitty template printed on an A4 size paper. So, print that out. Cut out the face completely and this is going to be our guide for how big to make details and exactly where to place them.
- You are also going to need 2 sponge cakes of the same size and pounds. You can use vanilla, chocolate, red velvet, or any of your favorite cake flavors as a Hello Kitty cakes sponge.
- Take one of the baked cakes and place the cheek of the Hello Kitty against the edge of the cake. Make sure to note where the nose is because that is the central point of the face and cut it.
- Cut the cake straight down at the point.
- Take your second cake, and put it under the first one to cut it the same size.
- Turn it around and join them together. Now, you will have the right width for your cake.
- Hold your Hello Kitty template over the top and use it as a guide.
- Trim off a small amount, just a tiny bit from the top and bottom, just to straighten up the middle edge.
- Next, use one of your templates to cut off the Hello Kitty cake ears.
- Again, use your template as your cutting guide frequently for better results.
- Round off the lower edge of the ear. So that it fits snuggly against the round cake.
- Put them in place and then use your template to cut around again and get it exactly right.
- The simpler a cake design looks, the more exact it needs to be to make it look good.
- Trim the Hello Kitty ears of the same height as the height of the cake. You can do this by slicing some off the bottom of the ear.
- And then you can put your ears to one side for the time being.
- Slice through the cake from the center and split it into two layers.
- Put a smear of frosting on your cake board to stop the cake from moving around. And put your bottom layer in place.
- Add a thin layer of strawberry or blackberry jam in between the layers of the cake. You may also use lemon, curd, pineapple sauce, or any other filling of your choice.
- Then add the top layer of cake and clear away all the crumbs. So they don’t get stuck in your frosting.
- Pile some of your frostings on top of the cake and spread it out over the top using a spatula or a palette knife.
- Spread it gently down and around the cake. Get more frosting out of the bowl as needed.
Texture Time!
- Hold and use a flexible piece of plastic, to smooth the cake texture. You can easily get it from any online or in-store stationary shop nearby. You may find plastic folders or document pockets there. Buy them and cut them up to use for this purpose.
- Now, use a palette knife to smooth the edges.
- Take one ear at a time and cover it in frosting on the base and the sides.
- Put it into place and then use your spatula to smooth it up.
- Cover the top and smooth the sides of the ears to give the slightly pointy Hello Kitty ear shape in the cake.
Moving onto the final frosting phase!
- To make the Hello Kitty cake whiskers, you can use some black licorice or fondant. Cut it thinner like strips and use the template to measure the length of each whisker.
- Cut a long thin strip of Licorice or Fondant and use it to outline the face of Hello Kitty Cakes.
- Now if you don’t have any Licorice or fondant that is long in a roll-like thin in-stores near you. Just roll it out thinly into a long snake and outline it. Because it is a cartoon character, they always look better outlined because that’s how they are drawn.
- Hold your template above your cake, now don’t touch the cake or the icing with the template. Just make sure to hover it over the cake and hold your whisker in position, then move the template and put the whisker down in place. Repeat that on the other side too.
- This will just help you to get it exactly how it is on the Hello Kitty template so that it looks the same.
- Make an oval shape nose out of Licorice or Fondant, whichever you have. Don’t forget to keep an eye on your Hello Kitty template for the perfection of your cake.
- Cut the two eyes out of Licorice again. You can use fondant if you would rather and then place them on the cake in exactly the right spot.
- To make the Hello Kitty cake bow, grab two 60 grams and 1 of 20 grams fondant balls in the red or pink of your choice.
- Take one of the larger balls and squash one end of it between your palms slightly.
- And then put it on your template and flatten it with one hand while supporting its top edge with the other hand. So that you are keeping it within the shape of your template.
- Repeat that for the other side of the bow, squash it and then flatten it and then keep it in the shape of the template.
- Next, take a teaspoon to give an indented texture on each side of the bow placed at the top of your Hello kitty cake. Just as you can see in the template for a real touch.
- Pick your 20 grams of fondant and roll it into a nice and neat ball. Place it in the center and flatten it slightly to get it to the right size using the palm of your hand.
- Gently pick up your bow and place it on your Hello Kitty cakes just in between the last two fondants space.
Last Touches:
- Take a bowl. Now you are going to have a small amount of frosting. Add a pinch of yellow edible food color and mix it well.
- Put the yellow color frosting in a Ziplock bag.
- Twist the bag.
- Cut off the very slight corner of the zip lock bag.
- Hold it in the center of the nose and pipe the frosting to fill the nose of your lovely Hello Kitty cakes!
Chances are that you might need to get your finger help to smooth off the layers within the black fondant outline of the nose of your Hello Kitty Cake.
we offer different cakes as well like